According to research, there will be over 4.258 billion email users in 2022, and the number of emails sent and received daily is expected to reach 333.2 billion emails by the end of the year.
Utilizing emails for sales in business communication adds a lot of value as it helps attract more prospects, close more deals, and increase engagement. In fact, email campaigns generate $42 for every $1 spent, which is an incredible 4,200% ROI. It’s a fast, affordable, and accessible method to reach out to people worldwide. “Creating valuable, personal touches – at scale.” That’s how David Newman described email marketing.
According to EduBirdie, 80% of professionals say email marketing can significantly help grow the business by pitching new customers and retaining current ones. However, despite its simplicity, implementing email services in business entities can be complicated without the right tools. Investing in the right technology is essential and pays off efficiently.
Although many marketing experts consider using email automation tools only to save time, others believe in the importance of tracking email campaigns and their detailed reports. Therefore, in this article, we will take a closer look at a cold email outreach platform, SalesHandy. An email management, automation, and monitoring tool businesses implement to grow their customer database over time.
Overview
We’ll start this SalesHandy review with a detailed overview of the platform; what is it? How does it work? And what added value does it bring to the table? Furthermore, we’ll showcase some of the alternatives and their features compared to SalesHandy.
What is SalesHandy?
SalesHandy is a web-based email automation tool developed to improve sales teams’ performance through automating the cold email sequence procedure. It’s an online method to increase productivity and generate revenue over time by introducing the company’s products and services to new customers via email. Although we’ll discuss everything in detail later in this SalesHandy review, we’ll briefly list its functionalities below:
Automates the cold email outreach process
Sends corresponding follow up emails automatically
Ensures email deliverability to recipients’ inboxes
Facilitates the creation and use of email templates
Founded in 2015, the Indian-based company focuses on cold email management and tracking to improve email quality and reliability. It does that by providing an automated email sequence depending on how the targeted clients behave.
How do I install SalesHandy?
SalesHandy offers email tracking add-ons that can be implemented in Google Chrome and Microsoft Outlook. It also offers a LinkedIn add-on to find email addresses across the platform. Following, we’ll demonstrate how to install SalesHandy on both browsers:
You’ll get a pop-up window asking for confirmation about adding the extension to Chrome
Note: If you don’t have an account on SalesHandy, the extension will give you the option to create one right away.
You can also visit the SalesHandy website, click on the Product tab, under the Email Tracking section, click on Email Tracking for Gmail, and it will open a new page. Click on Add to Chrome.
Installing SalesHandy Outlook Plugin
Visit the SalesHandy website, click on the Product tab, under the Email Tracking section, click on Email Tracking for Outlook, and it will open a new page. Click on Download Outlook Plugin.
The next step is to complete the installation process, close your Outlook browser or application and reopen it. You will see the add-on shortcut, click on it, and log in to your SalesHandy account.
Note: the SalesHandy Outlook plugin is only available for Windows users, so if you have macOS, it won’t work.
How do I Use SalesHandy?
SalesHandy is a web-based application, and it has a friendly, well-organized interface that helps users learn it quickly. However, there are two primary services, cold email outreach and email tracking.
Accessing SalesHandy services requires installing the add-ons or accessing the web-based application via a web browser. We’ve already explained the steps to install the add-ons above, and for the web-based app, the process is pretty straightforward. You need to sign up on the SalesHandy website, Sign in, and you’re ready to go.
Linking your email to the platform
After you’re logged in, the first thing to do is link the email accounts you want to use with SalesHandy. It supports two emailing platforms to integrate with, Gmail and Outlook, and to do that, follow the steps:
Click on Settings
Click on Email Accounts which can be found under the User Settings section
Click on Add Email Account button
A new window will show up asking you to choose the type of your email account
Click on the one you want
Enter your login credentials
You can find all added emails in one place, and it has many customizable options. For example, you can change the daily sending limit, add a signature, add a custom domain, and enter a BCC email address.
Note: you can find those options by clicking the Edit button for all linked email accounts.
Custom fields
Custom fields are an optional feature in SalesHandy, and it helps users personalize email blasts. It can be found in Settings, under the Company Settings section, then clicking on Add Prospect Field button.
Custom fields offer two types of variables, as it could be a text or a digit. In order to add a custom field, you need to name the field, select the variable type then add a fallbacktext.
Note: adding a fallbacktext will automatically fill the created field when it’s blank.
Creating Schedules
Schedules can help organize the time and automate sending emails on specific dates. However, to manage schedules, go to Settings, click on Schedules under the User Settings section, then click on Add New Schedule.
Schedules can be customized; users can name them, change the time zone, and choose each schedule’s days and hours. Also, users can mark any created schedule as default, which will be attached to newly created email sequences. Dealing with schedules is flexible and easy, and any created schedule can be used in multiple sequences.
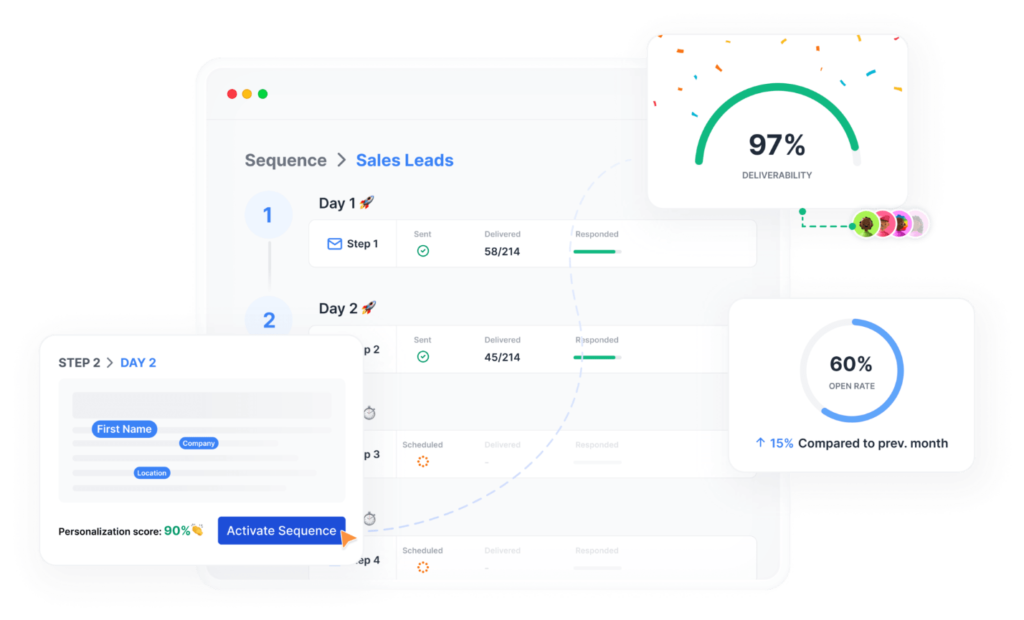
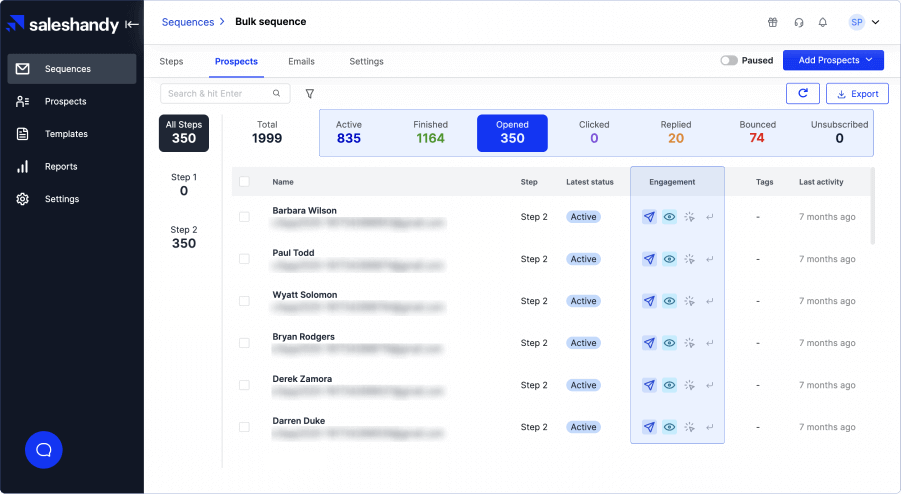
Dealing with sequences
An essential step in the journey of configuring the SalesHandy account is the Sequences. As the name suggests, users can create a particular sequence of emails that will be sent depending on multiple factors. Sequences will increase the outreach and provide useful statistics.
To create a sequence, follow these steps:
Click on the Sequence tab
Click on Add Step button to create the first step in the sequence
A new window will pop up to write an email, where you can find many options that help to create a professional email
Besides the subject field, you can find the {} icon, which allows adding the custom fields you created before; this icon is also on the right of the toolbar
Email Templates are also available to choose from, or you can create your own template by writing the email, then clicking on the Templates button, then on New Template
Many interesting options can be found in the toolbar, and by clicking on the three dots, you can add images and links to your email.
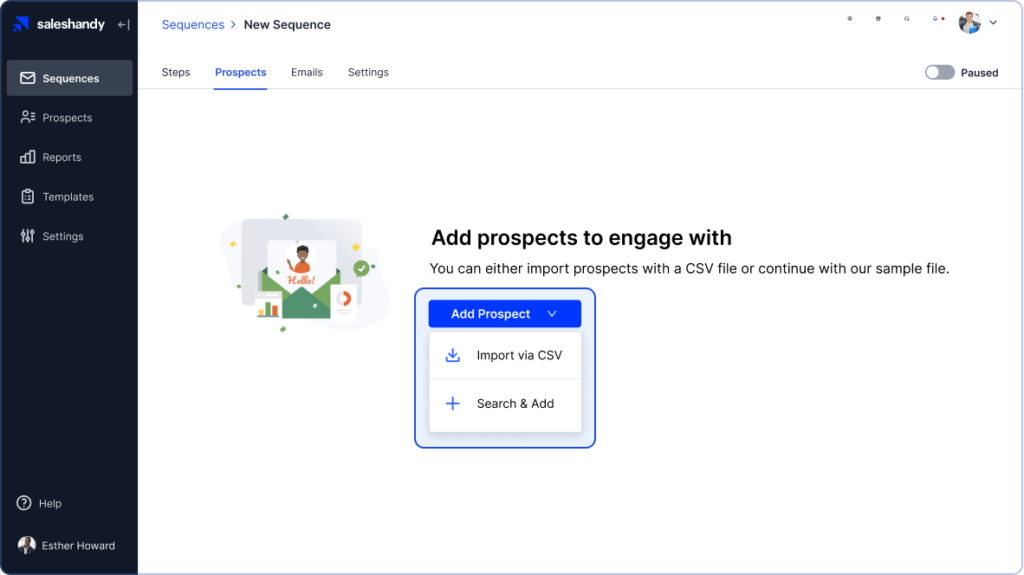
Now it’s time to configure the Prospects options:
Click on the Prospects tab to add prospects
Two options are available, Import via CSV file or Search & Add option.
Importing a CSV file is easy, just click on it and upload your CSV file; after that, a window will show up with all the fields included in the file and the information next to each field.
You can map each info with the created custom field. Also, you can select from the steps you created to add.
After importing the prospects, SalesHandy offers an email validation service that determines which prospects are valid and which are not.
By clicking on the Sequence Settings tab, you can find many options to configure sequences. You can select the default schedule and email and choose the unsubscribe message. The final step to activate the created sequence is by enabling the slide in the right upper corner.
Note: you can find detailed information about emails by clicking on the Emails tab.
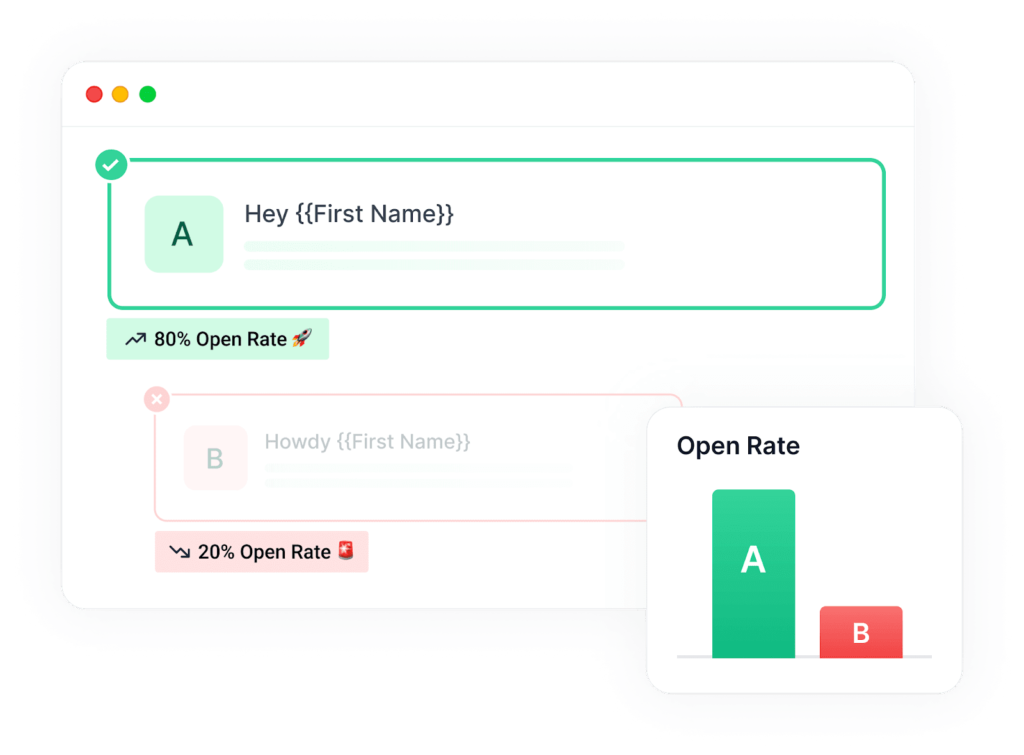
Send test email
There is an option called Send a Test Email, and by enabling this option, the created draft will be sent to your email account. After doing so, you will notice the first step showing up with many options available; you can delete, modify, or add an email variant B by clicking on A/B Test. The email variant allows creating multiple emails with different content and compares the performance of each.
How do I use SalesHandy in Outlook?
Integrating the SalesHandy app with Outlook is easy. First, you need to get a plan that offers an Outlook integration, like the Regular plan, which we will discuss later in this review. Then download the SalesHandy Outlook plugin from the website by following the earlier steps.
After installing the SalesHandy plugin, a shortcut will appear in Outlook; click on it, enter your SalesHandy account credentials, and you’re ready to go.
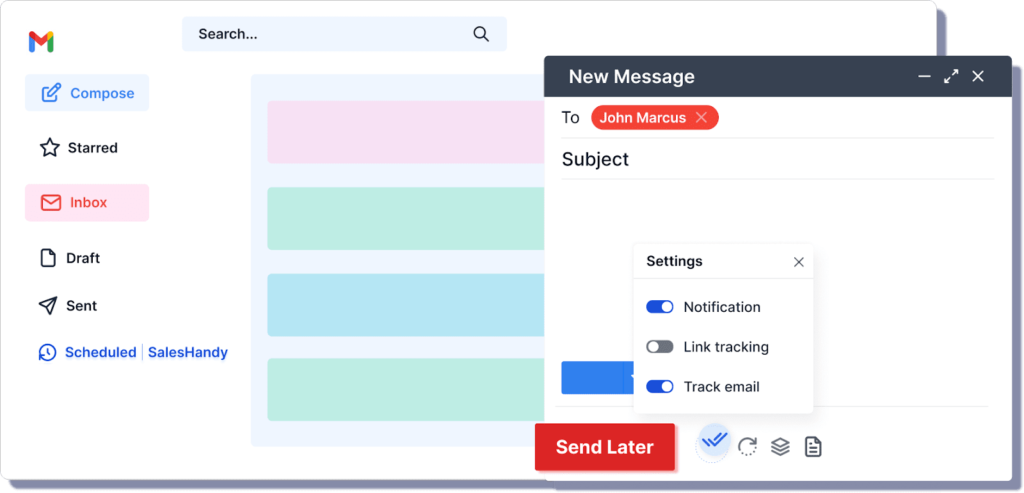
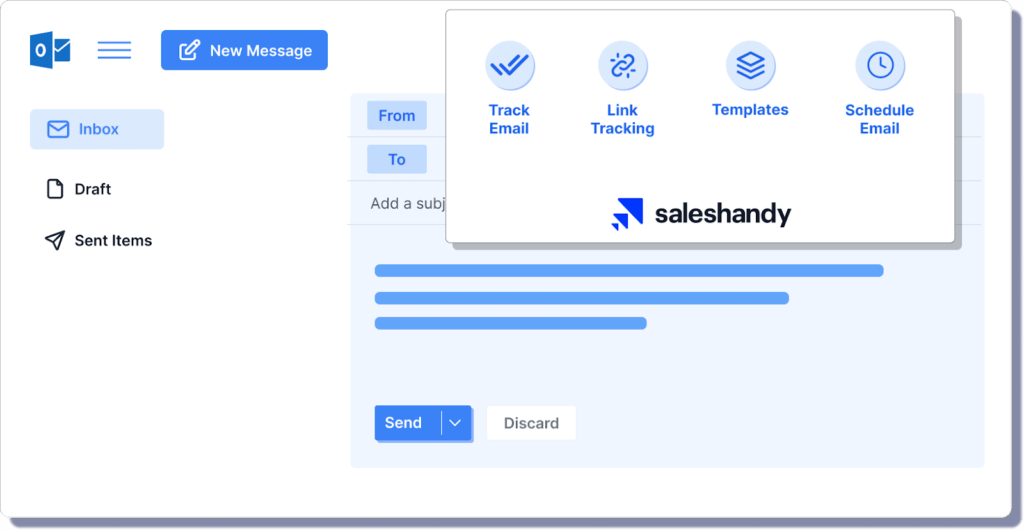
SalesHandy plugin will add new buttons which you can use when composing an email. The buttons are Track Email, Link Tracking, Templates, and Schedule Email
Track Email button to track an email after sending it out
Link Tracking button notifies you when a prospect clicks on links inside your emails
Templates button will provide many templates you can use in your email
Schedule Email button allows the users to select a specific time to send the composed email
How do I track an email on SalesHandy?
SalesHandy offers an email tracking service that enables tracking opened emails and clicked links, in addition to generating detailed reports. We’ve already explained how installing the Outlook plugin enables the Tracking button. Furthermore, you can track emails with the help of the Chrome extension, which will integrate with your Gmail account and provide many options to track the emails’ activity.
After installing the SalesHandy Chrome extension, go to your Gmail account, click on Compose, find the Tracking button in the left lower corner of the window, click on it, and activate the email tracking.
You can also do that directly through the web-based application. Go to the SalesHandy app, click on the Emails tab, and you can track each email you send and check whether it’s opened or replied to.
Note: SalesHany pricing for tracking emails is different from cold emails service, and later in this SalesHandy review, we’ll spotlight both.
Is SalesHandy secured?
Security and privacy are essential when using third-party tools. However, SalesHandy is GDPR-compliant, which means users can trust SalesHandy and use it with no hesitation. Moreover, signing a DPA (Data Processing Addendum) is also an option.
Is SalesHandy accurate?
Every system has bugs, and for the credibility of this SalesHandy review, we need to say it also has its bugs. The tracking service is 98% accurate, leaving 2% for mistakes that could happen in rare scenarios.
SalesHandy Pricing
The most essential part in the SalesHandy review is pricing. Evaluating the service and its pricing depends on many factors, like its efficiency, productivity, and potential revenue increase. SalesHandy benefits both marketing and sales teams and offers a variety of plans and services for different prices.
How much SalesHandy cost?
As seen above in this SalesHandy review, it offers two primary services: SalesHandyCold Emailing and SalesHandyEmail Tracking. Both are available for a reasonable price; you can see below the details and the available plans for each service.
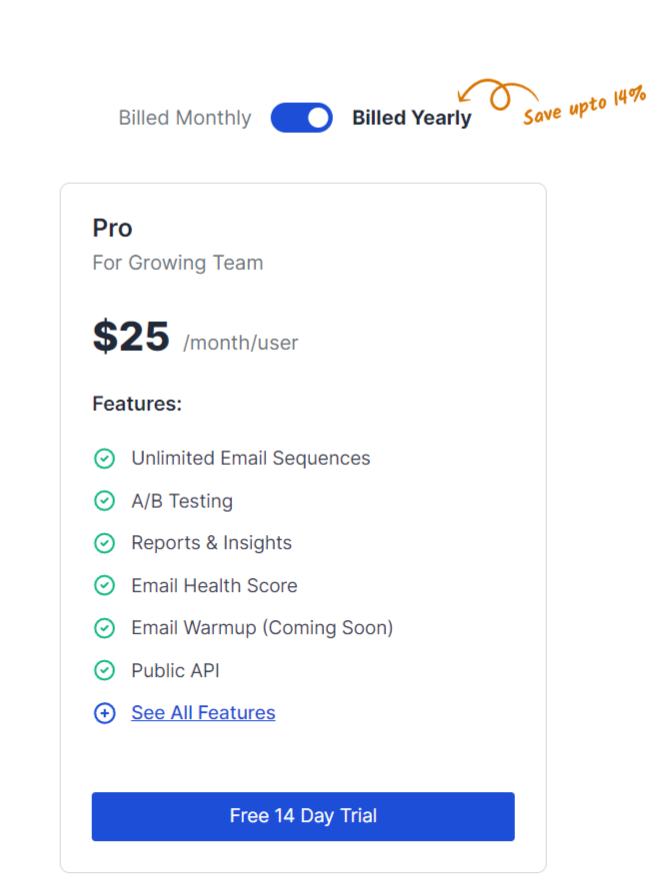
Cold Emailing service
Cold emailing service has only one plan, which is the Pro Plan which includes many features:
Unlimited Email sequences
A/B Testing
Reports and insights
Public API
Open, click, and reply to tracking
CSV Import
Find and add emails from LinkedIn
Shared templates
HTML editor
There are two options available to pay for this plan:
Billed monthly: costs $29 per user per month
Billed yearly: costs $25 per user per month
SalesHandy offers a free trial for 14 days, so users can try it and check if it suits their business needs.
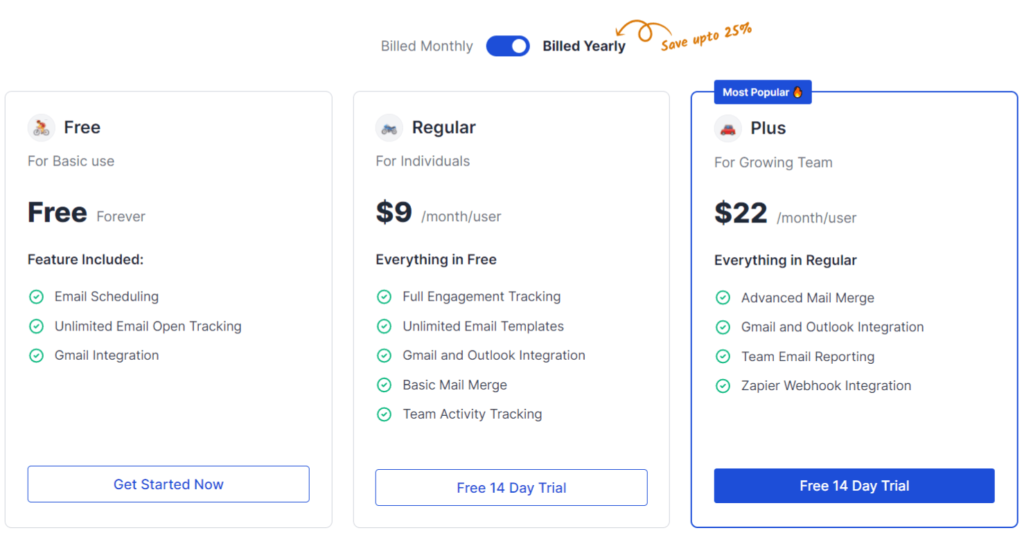
Email Tracking Service
SalesHandy offers three plans for a reasonable price to use this service, a freemium plan is also available for individuals.
Free plan: free forever with limited features
Email scheduling
Unlimited email open tracking
Gmail integration
Regular plan: costs $12 per user per month when billed monthly and $9 per user per month when billed annually
Full engagement tracking
Unlimited email templates
Gmail and Outlook integrations
Basic mail merge
Team activity tracking
Plus plan: costs $27 per user per month when billed monthly and $22 per user per month when billed annually
Advanced mail merge
Team email reporting
Zapier webhook integration
It’s noticed in the SalesHandy pricing system that when billed annually, clients can save up to 25%, so it’s better to go for an annual subscription.
Email verification is also available as an add-on, and it costs $60 for the cold emailing service and $59 for the email tracking service. It offers 30,000 email verification for either.
Is SalesHandy free for Outlook?
Unfortunately, using SalesHandy with Outlook is not available for free. It’s only available in the Regular and Plus plans, but you can use SalesHandy with Gmail for free; the Chrome SalesHandy extension is available in the free plan.
As we can see in this SalesHandy review, it offers significant features and tools that help to maximize the outreach. In this section, we will list the most valuable features:
Provide detailed reports and statistics
Reports are critical in any business, especially for the marketing and sales departments. SalesHandy offers detailed statistics for all emails, and users will be able to review the number of opened emails, replies, and clicked links. These reports help build a good perception of the work progress and estimate the future benefits.
Note: this feature is only available for team admins.
Rates are also available; admins can see open, reply, and link click rates simply by navigating to the Email Reports tab. Moreover, filtering this data is also an option to get specific information.
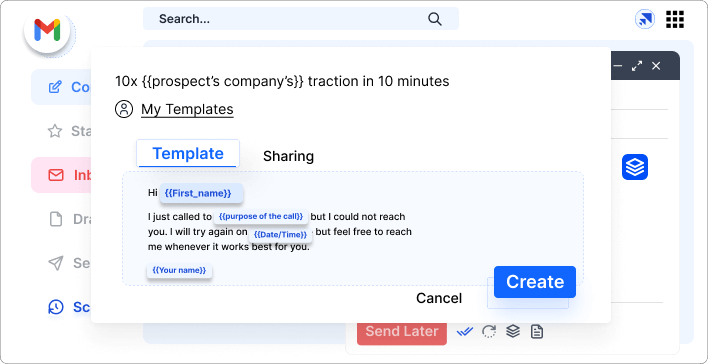
Useful Email Templates
Templates are a great way to save time. SalesHandy offers unlimited email templates that can be used directly in Gmail and Outlook with total ease. Moreover, templates are customizable, and users can create new templates, save, reuse, and share them with other members. Templates can be personalized using Merge Tags (custom tags) and can be created using an HTML code.
SalesHandy also offers a tracking feature for each template, and users can track the template performance and know which template is doing better.
Integrate your CRM with SalesHandy
Another great feature we’ll discuss in this SalesHandy review is integrating the CRM system with your SalesHandy account. This feature helps users to manage their customer records effectively. In order to do that, go to My Profile, then add the CRM ID in the BCC field, and you’re done.
Schedule your emails from Gmail and Outlook
Users don’t need to schedule emails from the SalesHandy website. The Chrome extension and Outlook plugin allow users to schedule composed emails easily by clicking on the Schedule Email button. This feature will speed up the work process and reduce admin work by using this shortcut.
What are SalesHandy alternatives?
SalesHandy is not the only solution for email tracking and cold email sequences. Actually, many other tools can do the job and be used as an alternative. We will discuss some of these SalesHandy alternatives below in our SalesHandy review, so you can know the difference before deciding which tool is the best for you.
Woodpecker.co
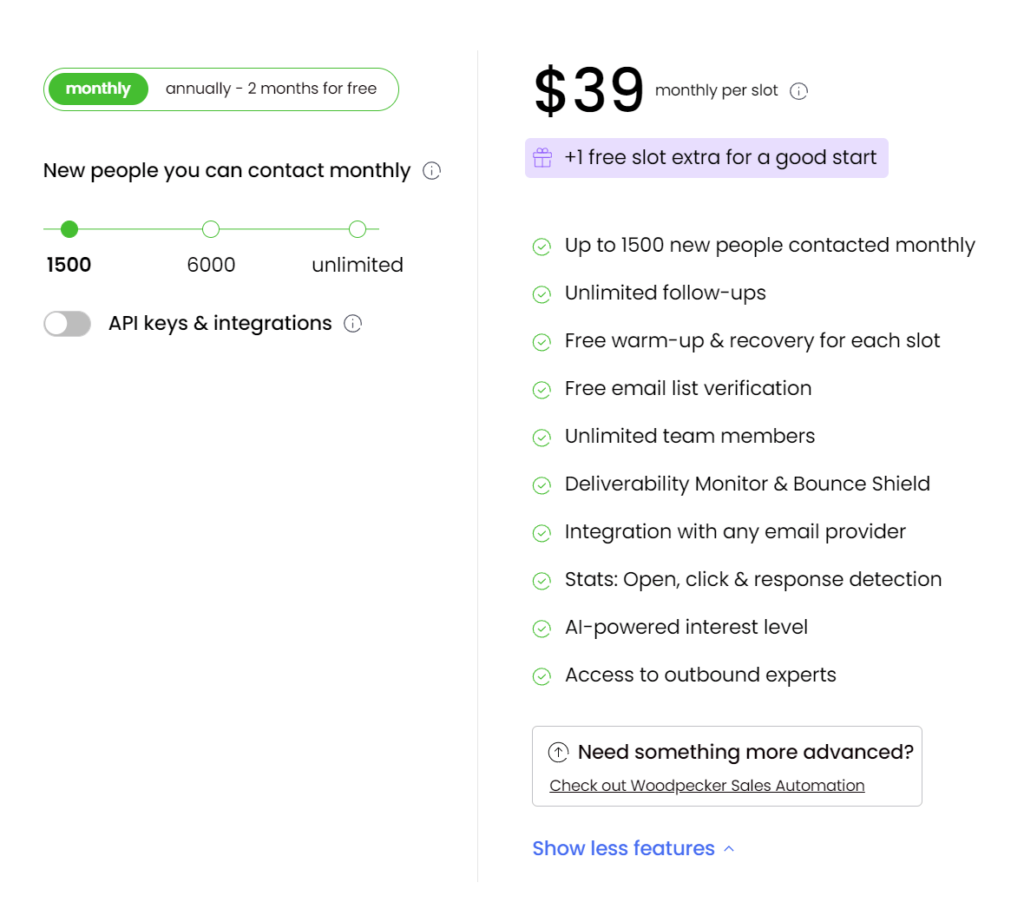
Woodpecker is a powerful cold email platform that provides many features to help users get new customers. The main difference between Woodpecker and SalesHandy is that Woodpecker has its own stand-alone application, while SalesHandy is a web-based solution with add-ons for Chrome and Outlook. However, the features of Woodpecker are listed below
Email warm-up & recovery: this feature builds the sender’s reputation, which decreases the possibility of getting blocked
Bounce shield: this feature protects the email from being blocked by the email provider. To do that, Woodpecker will send a random number of emails at different times.
Sequence triggers: sequence optimization offers triggers to use; in this case, sending emails depends on prospect behavior
Integrate with CRM
A/B tests
Free trial
As we can see, both SalesHandy and Woodpecker offer similar features, but Woodpecker has some features that aren’t available in SalesHandy.
As for pricing, Woodpecker has a different price for each service it offers. For example, the Cold Email service is $39 per user per month and offers two months free if billed annually. However, SalesHandy is more affordable for the same service.
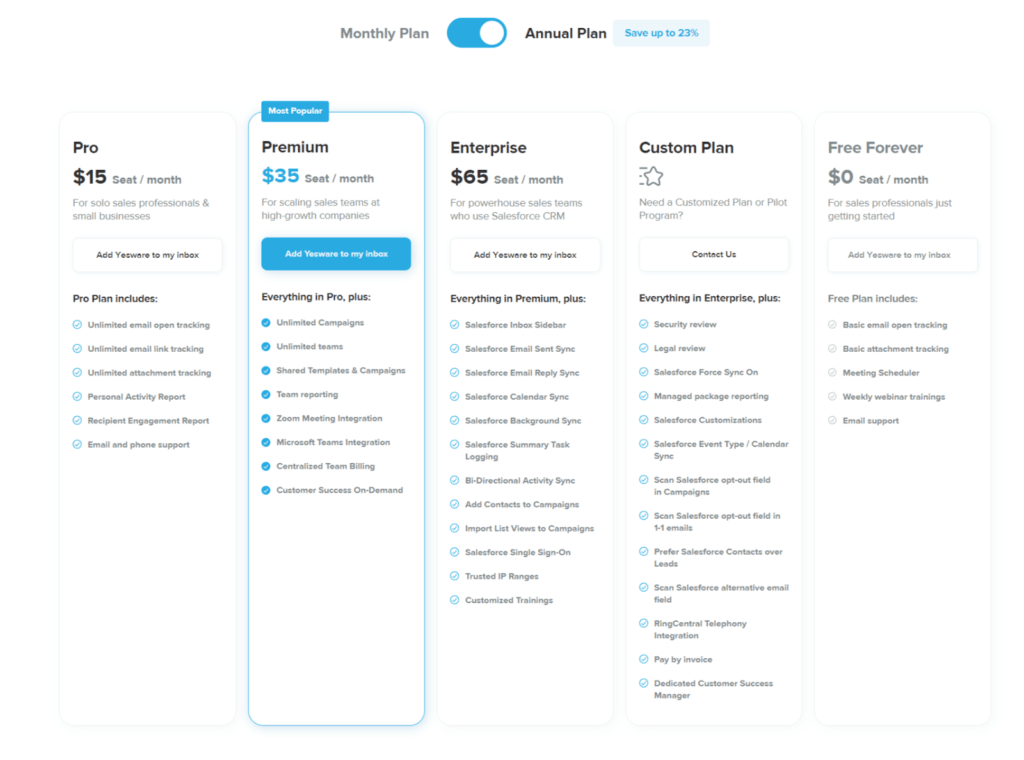
Yesware
Another cold email platform to compare with is Yesware. Although both do the same job, Yesware offers unique features that users should look at. The most important features are listed below.
Real-time notifications: keep up with all the updates, clicks, attachments’ views, and opened emails in real-time.
Multi-channel campaigns: this feature increases the outreach and customer database over time.
Meeting scheduler: integrate with calendar platforms and set up meetings with recipients
Integrations: integrate Yesware with Outlook, Gmail, Salesforce, LinkedIn, Zoom app, Clari, Docsend, and Microsoft Teams.
Freemium plan is available with limited functionality
As we can see, Yesware is hard to beat with all these features, but SalesHandy can be helpful as well even without some of these features. However, SalesHandy is a more affordable option than Yesware.
Mixmax
Mixmax is an email outreach tool that has similarities with Yesware and offers almost the same features. It’s easier to use than SalesHandywith many excellent features available:
Task management
Integrate with CRM
Calendar
Email automation
Email categorization
Email scheduler
Notifications and alerts
Side chat
Although SalesHandy covers these functionalities, Mixmax has more options when it comes to integrations, which is a significant advantage for Mixmax. Prices in MinMax are more affordable than Yesware and can be competitive with SalesHandy.
SalesHandy Pros & Cons
SaleshandyPros
SaleshandyCons
A free plan is available, and a free trial for paid services is available
Limited functionality in the free plan
Custom tags are available
The tool is not suitable for enterprises and big corporations
Easy integration with CRMs
The limitation of sending 200 emails per day in the regular plan
Import data from CSV file
Unlimited templates in paid plans
Chrome extension is available for free
Outlook plugin is only available in paid plans
Available as an extension to browsers and an add-on to Gmail and Outlook. In addition to a web-based platform
Detailed documentation on the SalesHandy website
Track clicked links in the emails
Provide detailed reports and rates
Simple and easy to start with
A/B test for each step in a sequence
Conclusion
Email automation solutions play a vital role in sales, marketing, and promotion. SalesHandy is a simple, affordable, and efficient email automation and tracking solution with enough flexibility and functionalities to fit many business needs.
The web-based tool is perfect for small to medium companies and individual users. Although other platforms might have more advanced services, SalesHandy could be a good start for a reasonable price. Hopefully, this SalesHandy review covered all relevant information and practical instructions.
Reviewed By Rem Darbinyan
Revolutionizing industries with AI, Rem Darbinyan is the CEO of ViralMango and an entrepreneur, AI expert, and influencer marketing strategist.